By — Danny Kistner
When most people say “mechanical keyboard”, they think about the clicky, clunky, cream-colored external boards from the 80’s. In more recent years, however, by which I mean the last decade or so, popularity has surged online in places like Reddit and YouTube, in regards to people building their own. After watching several dozen of these mech builds deep into quarantine, and doing a bit of my own research, I decided to do the same.
Why Mechanical Keyboards
Most people don’t really understand why someone would pay several hundred dollars for something you have to then build yourself, especially not when you can buy mechanical keyboards for a fraction of the price already built, and in all honesty, you don’t, but the question is still a little silly for people who do build mechanical keyboards as a hobby. Why knit your own hat? Why write your own poems? It’s an expensive hobby to uphold, but at the end of the day, no other keyboard comes close in quality and personalization after you build or mod your own—not to mention, it’s fun.
So when you ask the question, why build your own mechanical keyboard, the response will probably be something like, why not? If you’re willing to spend the money, then you’ll often produce a product that works well, looks nice, and improves the lifespan of your laptop.
Building It
There are a couple of items you need to buy when it comes to a mechanical keyboard, and as I said before, it generally becomes pretty pricey, but ultimately you’re paying for high quality. The most important item is probably the PCB, which, to put it simply, is the electronic board that makes the keyboard go and it will also connect to your computer through a cable, which is generally USB-C. Usually, you have to solder your own, but more recently, companies like KBD Fans (the online store where I bought practically all my parts) have been releasing hot swap PCBs, which essentially make it so that you don’t have to solder anything.
Good news for those who don’t have the time to solder or money to buy a soldering iron for one time use. I’ve listed all the products I used down below, as well. I should also note that I ended up building a 60% keyboard, which is one of the smaller sizes, but also the most popular and as a result, finding parts for 60%s is pretty easy.
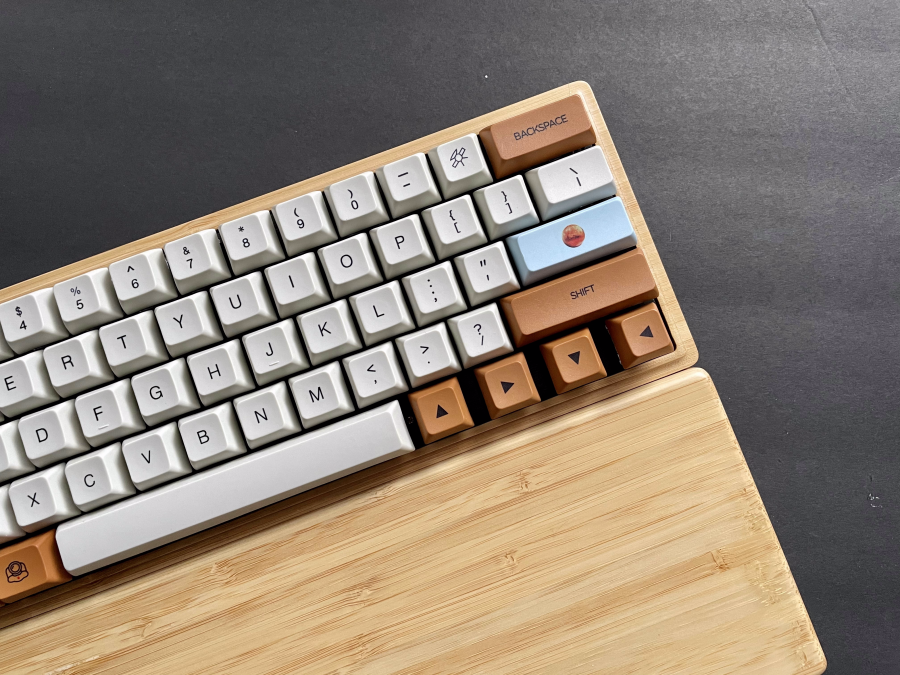
You’ll also need a case (to keep the keyboard in), a metal plate (which holds the switches), stabilizers, switches, keycaps, and switch/stabilizer lube. Additionally, you can buy a couple of other accessories to improve the sound of your keyboard, like PCB or plate foam, as well as switch film, but those are generally optional, particularly if you want to save money.
The switches are what connect the keycaps to the PCB and are essentially what is used to communicate to the board what key you’re pressing. There are several different types, like linear or tactile, and several dozen different brands, like Gateron or Holy Panda, but as one of the more important personalizable parts, it’s best to do your own research. Stabilizers balance larger keys, like the spacebar or enter, and both stabilizers and switches should be lubed, though Taeha Types (someone known for his luxury mech builds), has two really good videos on the why and how.
I went for the Tealio V2 switches, mostly for their woody, full sound, and though they were more on the expensive side, they’re also considered pretty high quality. My stabilizers were pretty basic, however, and this doesn’t particularly matter as much, as the lubricant takes care of any poor quality clacking.
The keycaps are the fun part, and essentially decide the personality and aesthetics of the board. I went for space-themed, cream, brown, and powder blue ones, which came as a full set (for a 100% board, were you to build one) and with a keycap puller.
The process to build your own keyboard is actually quite self-explanatory, and is merely a matter of stacking the different products in the right order, after the somewhat arduous task of lubing all sixty-one keys and five stabilizers individually, however this video does a daily decent job of showing how it’s done in a fairly simple format.
Final Thoughts
I don’t regret at all my decision to build my own board, it’s made it more fun to type on or write with (great for coding) and paired with a pretty simple monitor stand from Ikea, it’s actually helped my posture as well. Whether or not a mech build is for you though, depends on quite a few different things, chief of which being time and money. What you get as a result though, it certainly worth the effort and will certainly be put to good use.
Suggested Product List
- Bamboo case ($58): https://kbdfans.com/collections/60-layout-case/products/60-bamboo-case
- Hot swap pcb ($55): https://kbdfans.com/collections/60/products/dz60rgb-ansi-mechanical-keyboard-pcb
- PBT KT1 Profile Keycaps ($32): https://kbdfans.com/products/pbt-kt1-profile-keycaps-1?variant=31423849300107
- Switch lube ($15): https://www.switchtop.com/product/geekhackers-switch-lube
- Stabilizers lube ($2): https://www.switchtop.com/product/super-lube-stabilizer-lube
- Plate ($22): https://kbdfans.com/collections/60-layout-plate-1/products/cnc-60-aluminum-plate
- Stabilizers ($18): https://kbdfans.com/collections/keyboard-stabilizer/products/cherry-original-pcb-stabilizers
- tealio v2 switches ($10 x 7): https://kbdfans.com/collections/zealios-switches/products/zealios-tealios-zilents